How to Hang Lights on Your Roof Safely and Efficiently
Hanging lights on the roof in Omaha, NE can be a concern due to the harsh weather conditions that the area experiences. Omaha is known for its strong winds and heavy snowfall, which can put a lot of stress on lights that are hung on a roof. Strong winds can cause the lights to sway and become loose, potentially causing damage to the roof or even causing the lights to fall. Heavy snowfall can also put a lot of weight on the lights, which can cause them to break or become loose. Additionally, the cold temperatures can make it difficult to work with the materials and hardware required for installation, increasing the risk of damage or injury. Therefore, it is important to take extra precautions and to use sturdy, weather-resistant hardware when hanging lights on a roof.
Understanding Roof Materials
Different types of roofing materials and how they impact the process of hanging lights
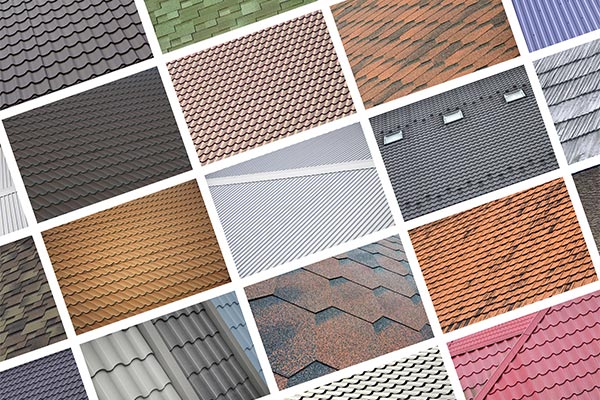
When it comes to hanging lights on a roof, the type of roofing material is an important factor to consider. Different roofing materials have varying levels of durability and structural integrity, which can impact the process of hanging lights.
For example, a metal roof is typically considered to be a good choice for hanging lights because it is strong and durable. However, a wooden shingle roof may not be as sturdy and may require more care and attention during the installation process.
Similarly, Tile roofs are brittle and can be easily cracked or broken if not handled with care during installation.
Asphalt shingles, on the other hand, are relatively soft, and drilling into them can cause damage. Therefore, it is important to choose hardware that attaches to the roof without penetrating it.
It is important to note that it is always best to consult with a professional or the manufacturer of the light fixtures for recommendations for the specific type of roofing material you have.
Tips for identifying the type of roofing material on your home
Identifying the type of roofing material on your home is an important step in the process of hanging lights. Different roofing materials have varying levels of durability and structural integrity, which can impact the process of hanging lights. Here are a few tips for identifying the type of roofing material for your home:
Look at the shape of the shingles: Asphalt shingles are usually rectangular or hexagonal in shape, while wooden shingles are usually irregular and have a more natural appearance.
Check the color and texture of the shingles: Asphalt shingles are typically dark and smooth, while wooden shingles are usually lighter in color and have a rough, textured surface.
Look at the age of the roof: If the roof is relatively new, it is likely that it is made of a more modern, durable material, such as metal or composite.
Check the roof's surface: A flat roof is likely made of metal or rubber, while a sloping roof is likely made of shingles.
Consult with a professional: If you are unsure about the type of roofing material on your home, consult with a professional roofer or home inspector who can help you identify the type of material and its suitability for hanging lights.
It is important to note that, sometimes, the roofing material may not be visible from the ground, and therefore it is best to consult with a professional for accurate identification.
Choosing the Right Hardware
Different types of hardware options for hanging lights on a roof
When it comes to hanging lights on a roof, choosing the right hardware is crucial for ensuring the safety and stability of the lights. There are several types of hardware options available for hanging lights on a roof, each with its own set of pros and cons.
Screws: Screws are one of the most popular options for hanging lights on a roof. They provide a secure hold and can be used with a variety of roofing materials, including metal and wooden shingles. However, screws can cause damage to delicate or brittle roofing materials, and can be difficult to remove once installed.
Clips: Clips are another popular option for hanging lights on a roof. They attach to the shingles or tiles without penetrating the roofing material, making them a good choice for delicate or brittle roofing materials. However, they are not as secure as screws and may not be able to hold heavy lights.
Adhesive: Adhesive is another option for attaching lights to a roof. It is commonly used on tile or metal roofs and it is easy to install. However, it may not be as sturdy as screws or clips and may not be able to hold heavy lights. Additionally, it may wear off over time due to exposure to the elements.
Magnetic Mounts: Magnetic mounts are a good option for metal roofs as they can be easily attached and removed without damaging the roof. However, they may not be able to hold heavy lights and are only suitable for metal roofs.
Hooks: Hooks are a versatile option for hanging lights on a roof, they can be screwed, clipped, or adhered to the roof, and can be used to hang lights from the gutters or eaves. However, they may not be as sturdy as screws or clips and may not be able to hold heavy lights.
Tips for selecting hardware that is appropriate for your roofing material
Selecting the appropriate hardware for your roofing material is crucial for ensuring the safety and stability of the lights. Here are a few tips for selecting hardware that is appropriate for your roofing material:
Check the weight limit: Make sure the hardware you choose is able to support the weight of the lights you plan to hang.
Consider the roofing material: Different roofing materials have varying levels of durability and structural integrity, so choose hardware that is appropriate for your specific roofing material. For example, clips are a good choice for delicate or brittle roofing materials, while screws are better for sturdy materials like metal or wood.
Research the product: Before purchasing any hardware, research the product and read reviews from other customers. Look for hardware that has a good reputation for being durable and easy to install.
Consult with a professional: A professional roofer or home inspector can help you select the appropriate hardware for your roofing material. They can also provide guidance on installation and safety precautions.
Check the warranty: Always check the warranty of the hardware you choose, if any. It will give you a sense of how long the product is expected to last and what is covered in case of any defects.
It's important to keep in mind that choosing the right hardware is crucial for ensuring the safety and stability of the lights, and that it's important to always follow the manufacturer's instructions and safety precautions.
Preparing for Installation
Steps for preparing your roof and surrounding areas before installing lights
Preparing your roof and surrounding areas before installing lights is crucial for ensuring a safe and successful installation. Here are a few steps to take before installing lights on your roof:
Clean the roof: Before installing lights, make sure to remove any debris or leaves from the roof. This will make it easier to work on and will also help to prevent any potential damage to the lights.
Check for damage: Inspect the roof for any signs of damage such as leaks, missing or cracked shingles, or any other issues that may need to be addressed before installing lights.
Measure the area: Measure the area where the lights will be installed and make sure there is enough space to accommodate them.
Gather necessary materials and tools: Make sure you have all the necessary materials and tools on hand before beginning the installation, such as screws, clips, adhesive, or hooks as appropriate, a drill, a ladder, and a level.
Prepare the surrounding areas: Before installing lights, make sure to cover or remove any nearby plants or furniture that could be damaged during the installation process.
Safety precautions: Always wear appropriate safety gear such as a harness and helmet and use a sturdy ladder to access the roof.
Preparing the roof and surrounding areas before installing lights will help to ensure a safe and successful installation. It will also help to prevent any potential damage to the lights and the surrounding areas.
Safety precautions to take when working on a roof
Working on a roof can be dangerous, it is important to take safety precautions to minimize the risk of injury or accidents. Here are a few safety precautions to take when working on a roof:
Wear appropriate safety gear: Always wear a hard hat, slip-resistant shoes, and a harness when working on a roof.
Use a sturdy ladder: Make sure to use a sturdy ladder that is long enough to reach the roof and is securely placed on a level surface.
Avoid working alone: It is always best to have someone to assist you when working on a roof.
Check the weather: Avoid working on a roof during inclement weather or high winds, as this can increase the risk of accidents or injuries.
Be aware of your surroundings: Be aware of any power lines or other hazards that may be present on or near the roof.
Follow the manufacturer's instructions: Always follow the manufacturer's instructions and safety precautions when installing lights or any other equipment on the roof.
Know your limits: If you are not comfortable working on a roof or do not have the necessary experience, it is best to hire a professional.
Taking safety precautions when working on a roof will help to minimize the risk of injury or accidents. It is important to always be aware of your surroundings and to follow the manufacturer's instructions and safety precautions to ensure a safe and successful installation.
Installing Lights
Step-by-step instructions for hanging lights on a roof
Hanging lights on a roof can be a bit tricky, but with the right tools and materials, it can be done safely and easily. Here is a step-by-step guide for hanging lights on a roof:
Prepare the roof: Before installing lights, make sure to remove any debris or leaves from the roof, check for damage, measure the area where the lights will be installed, and gather all necessary materials and tools.
Position the lights: Position the lights in the desired location on the roof and use a level to ensure they are straight.
Mark the location: Mark the location of the lights on the roof using a pencil or marker.
Install the hardware: Install the appropriate hardware for your roofing material. For example, if you are using screws, drill pilot holes in the marked locations and screw the lights into the roof. If you are using clips, attach the clips to the lights and slide them into place on the roof.
Test the lights: Once the lights are installed, test them to make sure they are working properly.
Clean up: Clean up any debris or materials left over from the installation.
By following these step-by-step instructions, you can hang lights on a roof safely and easily. However, it is important to always consult with a professional or the manufacturer of the light fixtures for recommendations and safety precautions.
Tips for ensuring proper placement and alignment of lights
Proper placement and alignment of lights is crucial for achieving the desired look and ensuring the safety of the lights. Here are a few tips for ensuring proper placement and alignment of lights:
Consider the purpose: Think about the purpose of the lights and where they will be most effective. For example, if the lights are for security, they should be placed in areas where they will provide maximum coverage.
Use a level: Use a level to ensure the lights are straight and properly aligned.
Test the lights: Once the lights are installed, test them to make sure they are working properly and are providing the desired amount of light.
Adjust as needed: If the lights are not providing the desired amount of light or are not properly aligned, make adjustments as needed.
Use a template: Some lights come with a template that can be used to mark the location of the lights on the roof, this can help ensure proper placement and alignment.
Consider the weather: Consider the direction of the sun and the wind when placing the lights, this will ensure that the lights are not obscured by shadows or debris.
Proper placement and alignment of lights are crucial for achieving the desired look and ensuring the safety of the lights. Following these tips will help you to ensure proper placement and alignment of lights on your roof.
Common mistakes to avoid during installation
Installing lights on a roof can be a bit tricky, and there are several common mistakes that people make during the installation process. Here are a few common mistakes to avoid when installing lights on a roof:
Not preparing the roof: Not cleaning the roof or checking for damage before installing lights can lead to problems during and after the installation.
Not using the appropriate hardware: Using the wrong type of hardware for your roofing material can result in a less secure installation and can even damage the roof.
Not following the manufacturer's instructions: Not following the manufacturer's instructions can result in a faulty installation and can also void any warranty on the lights.
Not testing the lights: Not testing the lights before and after installation can result in faulty lights that do not work properly.
Not considering the weather: Not considering the direction of the sun and the wind when placing the lights can result in the lights being obscured by shadows or debris.
Not taking safety precautions: Not taking appropriate safety precautions such as using a sturdy ladder and wearing safety gear can result in accidents or injuries.
By avoiding these common mistakes and following the manufacturer's instructions and safety precautions, you can ensure a successful and safe installation of lights on your roof.
Maintaining and Troubleshooting
Tips for maintaining lights and hardware to ensure they last for as long as possible
Proper maintenance is crucial for ensuring that your lights and hardware last for as long as possible. Here are a few tips for maintaining lights and hardware to ensure they last:
Clean the lights: Regularly clean the lights to remove any dirt, dust, or debris that may have accumulated on them.
Check the connections: Check the connections of the lights and hardware to ensure they are secure and not loose. Tighten any loose connections if necessary.
Check for damage: Regularly inspect the lights and hardware for any signs of damage such as cracks, corrosion, or wear and tear.
Store the lights properly: When not in use, store the lights in a dry and safe place to protect them from damage.
Use weather-resistant materials: Use weather-resistant materials such as stainless steel or aluminum for the lights and hardware to ensure they can withstand exposure to the elements.
Consult with a professional: Consult with a professional if you notice any problems with the lights or hardware. They can help you identify the problem and provide recommendations for repairs or replacement.
By following these tips, you can ensure that your lights and hardware last for as long as possible. Regular maintenance will help you to identify any problems early on and take necessary actions to fix them before they worsen.
Common issues that may arise with hanging lights on a roof
Hanging lights on a roof can be a bit tricky, and there may be issues that arise during the installation process. Here are a few common issues that may arise when hanging lights on a roof, and some troubleshooting tips for resolving them:
Lights not working: If the lights are not working, make sure they are properly connected and that the power supply is working. Also, check the circuit breaker and the fuse to see if they have tripped or blown.
Lights not aligned properly: If the lights are not aligned properly, use a level to adjust them. Make sure the lights are securely attached to the roof, and that the hardware is tight.
Lights not providing enough light: If the lights are not providing enough light, try adjusting the angle of the lights or increasing the wattage of the bulbs.
Lights not secure: If the lights are not secure, make sure they are properly attached to the roof and that the hardware is tight.
Hardware rusting: if the hardware rusting, use a rust inhibitor or replace the hardware with a rust-resistant material.
Troubleshooting these common issues early on can help prevent them from worsening and causing more problems. If you are unsure about how to troubleshoot a particular issue, it is always best to consult with a professional for guidance.
The article covers various important points related to hanging lights on a roof. The first point is the explanation of why hanging lights on the roof can be a concern, it's important to take safety precautions and ensure that the lights are securely attached to the roof to prevent accidents or damage. Next, different types of roofing materials and how they impact the process of hanging lights are discussed, it's important to choose the right hardware that is appropriate for the specific roofing material. The article also provides tips for identifying the type of roofing material on your home and for selecting hardware that is appropriate for your roofing material. Additionally, the article provides an explanation of different types of hardware options for hanging lights on a roof and the pros and cons of each option. The article also provides steps for preparing your roof and surrounding areas before installing lights, safety precautions to take when working on a roof, step-by-step instructions for hanging lights on a roof, tips for ensuring proper placement and alignment of lights, discussion of common mistakes to avoid during installation, tips for maintaining lights and hardware to ensure they last for as long as possible and troubleshooting common issues that may arise with hanging lights on a roof.


